
 Schedule of Classes
 Maps
Maps Canvas
 Directory
 Library
 LancerPoint
 Calendars
 Bookstore
 Student Email
 News & Events
 Police & Safety
 PCC Connect
 Parking
 COVID-19 Info
Creating Accessible Documents
In the context of this website, you are the owner of any document you wish to post online. As the document owner, you are ultimately responsible for ensuring the accessibility of that document before it can be posted to this website by Strategic Communications & Marketing.
Useful Tips for Creating and Checking Documents for Accessibility
Verify that the most recent versions of Adobe Acrobat Pro DC and Microsoft Word are installed on your PC or Mac. The following section of this guide assumes you are running at least Microsoft Word 2016 or later and an updated version of Adobe Acrobat Pro DC.
PCC's ITS department has the most recent versions of Microsoft Office and Adobe Creative Cloud and can install or upgrade these applications for you. If you don't have these installed, submit an ITS Helpdesk request.
Another important point to remember is to always retain your source documents. Once you have created a PDF from an Office document such as MS Word, don't delete the original. It is far easier to make edits and correct accessibility issues in a Word document first than it is in the PDF.
Creating and Checking Accessible Word and PDF Documents
Refer to the following as a 2-part primer for creating and checking documents for accessibility (508 compliance). This is not an exhaustive guide to making PDFs accessible but rather an overview covering the most common errors, fixes, and best practices.
Microsoft Word Tips
Upgrade Your Software
 Upgrade to the most recent version of Microsoft Word. If you have MS Word 2016 or
later, you should have a "Check Accessibility" option under the "Review" tab. Use
this tool to identify and correct common accessibility issues identified by MS Word.
You'll still have a couple of things to check and possibly correct once you've saved
your Word document as a PDF, but this can significantly reduce the amount of work
you'll need to do once you get there.
Upgrade to the most recent version of Microsoft Word. If you have MS Word 2016 or
later, you should have a "Check Accessibility" option under the "Review" tab. Use
this tool to identify and correct common accessibility issues identified by MS Word.
You'll still have a couple of things to check and possibly correct once you've saved
your Word document as a PDF, but this can significantly reduce the amount of work
you'll need to do once you get there.
Use Headings Correctly

Use document headings for structure, not style. One of the most common accessibility mistakes is to use Headings for style purposes (e.g., to make text look bigger and bolder or a particular color). If you would like your text to look a certain way, use the text formatting tools such as font size, bold, italic, etc. directly. Or you can create custom styles using the Styles pane. Just don't use Headings such as Heading 1, 2, 3, etc. for cosmetic purposes.
Why You Shouldn't Use Headings for Styling Purposes
Screen reader technology uses Headings to convey the structure and organization of a document to its users. Headings, such as Heading 1, Heading 2, etc., create document structure in the same way that a table of contents is organized. Word (as well as Google Docs) can auto-generate a table of contents for your document based on its headings. It will assume Heading 1 blocks are like "chapters" and will nest Heading 2 blocks as sub-sections of any Heading 1 preceding it (and so on for Heading 3, etc.). The bottom line is that Headings need to be nested properly to be accessible.
Properly Nesting Headings
Think of Headings the Same Way You Think of an Outline:
- Heading 1 is the first tier of bullets in an outline such as this.
- Heading 2 is like any second-level bullet. In an outline, you can't skip to a third-level bullet
without a second-level before it. Likewise, you should never skip a heading level
in your documents. Doing so will create an accessibility issue.
- Heading 3 can only exist after level 2 and so on.
- Heading 2: You can come back from level 3 to level 2…
- Heading 2: ...and have as many same-level headings next to each other as the content necessitates. Note that you could also return to a Heading 1 from a Heading 3, just not the other way around, just like this outline.
- Heading 2 is like any second-level bullet. In an outline, you can't skip to a third-level bullet
without a second-level before it. Likewise, you should never skip a heading level
in your documents. Doing so will create an accessibility issue.
- Returning to a Heading 1 signifies a whole new "chapter" or section of your content.
Just as an unordered (bulleted) list won't allow you to skip from a Heading 1 to a Heading 3, never skip a heading level when formatting headings on a page.
Use Tables for Data, Not Layout
Use tables for data only, not for layout. Another common mistake that makes accessibility a challenge in PDFs is when a table has been used to visually lay out content in a particular way. Tables should only be used for their intended purpose – to display content within a grid of columns and rows identified by column headers. Avoid row and column spans and keep your table heading outside of the table if you require one.
Every table should have at least one header row, and often the first column will also be marked as a header when it relates to the subsequent columns in its row. This should be addressed in your source document. Word's default table settings should already default to these properties being set. But you should always verify this, or you'll see table errors after an accessibility check.
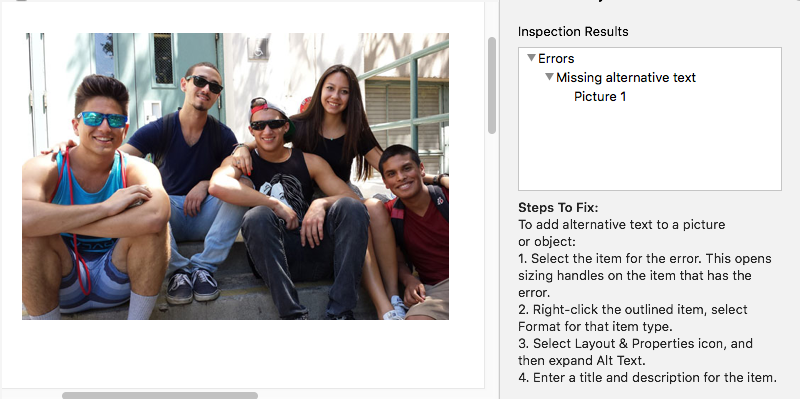
Images Require Alternate Text or should be marked as Decorative
If an image adds information to a document that isn't provided elsewhere in the text, add alternate text to images. Text that describes an image is read back to users using assistive technology such as screen reader software.
Images that don't add new content to a document can be marked as decorative, and will be skipped by screen reader software.
Microsoft Word's Accessibility Checker will provide you with the ability to add alternate text to your images, or to mark them as decorative.
Create a PDF from Word
Select the Acrobat tab in Microsoft Word and click the "Create PDF" button to preserve document structure and any accessibility fixes. If you do not see the Acrobat tab in Microsoft Word, ensure you have Acrobat Pro DC installed on your computer, as this will automatically add this tab to Word.
Adobe Acrobat Pro Tips
Note: If you jumped straight here but skipped the Microsoft Word Tips section above, please go back and review that section. Unless you have very few minor edits to an existing 508-compliant PDF, you always want to start from scratch in a new Word document and use the Acrobat "Create PDF" button – you'll be thankful that you did.
Upgrade Your Software
Make sure that you have Adobe Acrobat Pro installed on your system. Acrobat Reader and Acrobat Standard lack the features required for this tutorial.
Check Your PDF for Accessibility Issues
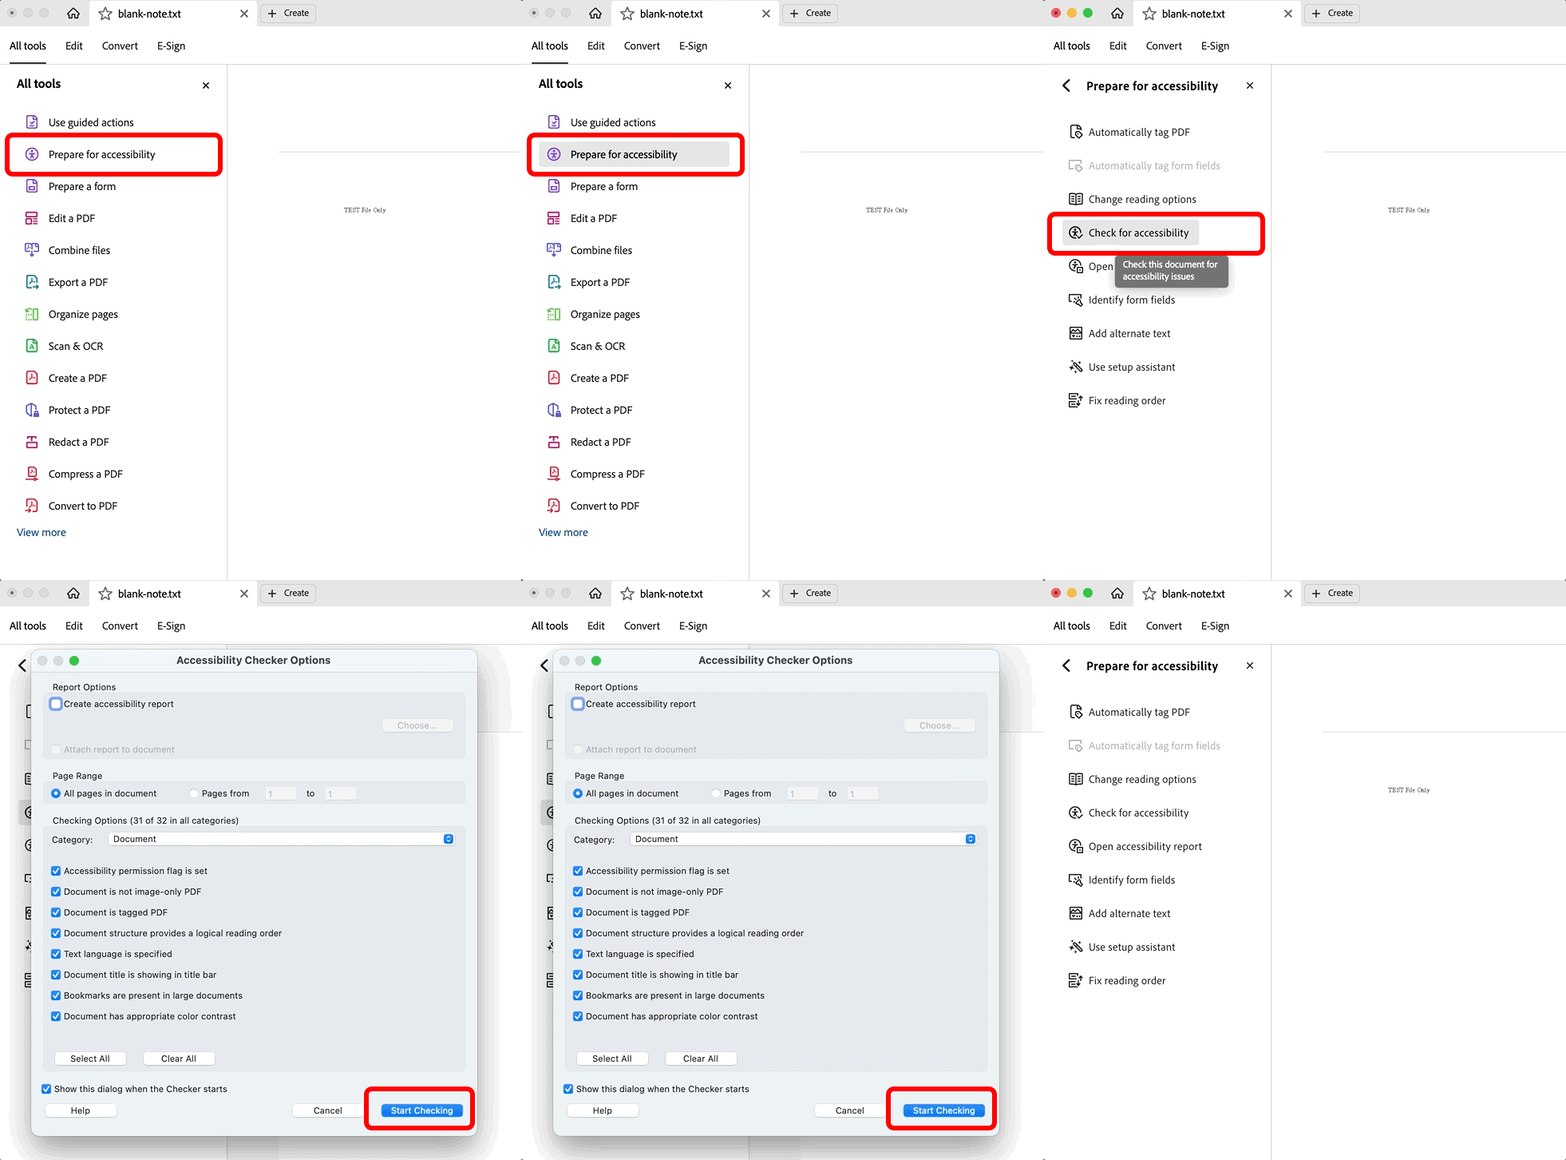
Verify that your PDF files meet accessibility standards for people with disabilities. To do this, open your PDF and open the Prepare for accessibility tool found under All tools. If you already ran the Make Accessible action outlined above, you can skip to Inspecting the Results further down.
If you don't see the Prepare for accessibility tool button right away, simply open the All tools View, and scroll down (or select "View more") until you find it. You should drag this up toward the top of the Tools list so that you'll have it readily available to you for every document you work on in Acrobat.
Open the Accessibility Checker by using the Check for accessibility action within the Prepare for accessibility tool.
Check for Accessibility Issues
- Open the Prepare for accessibility tool
- Click Check for accessibility
- Click Start Checking
- View the results
Inspecting the Results
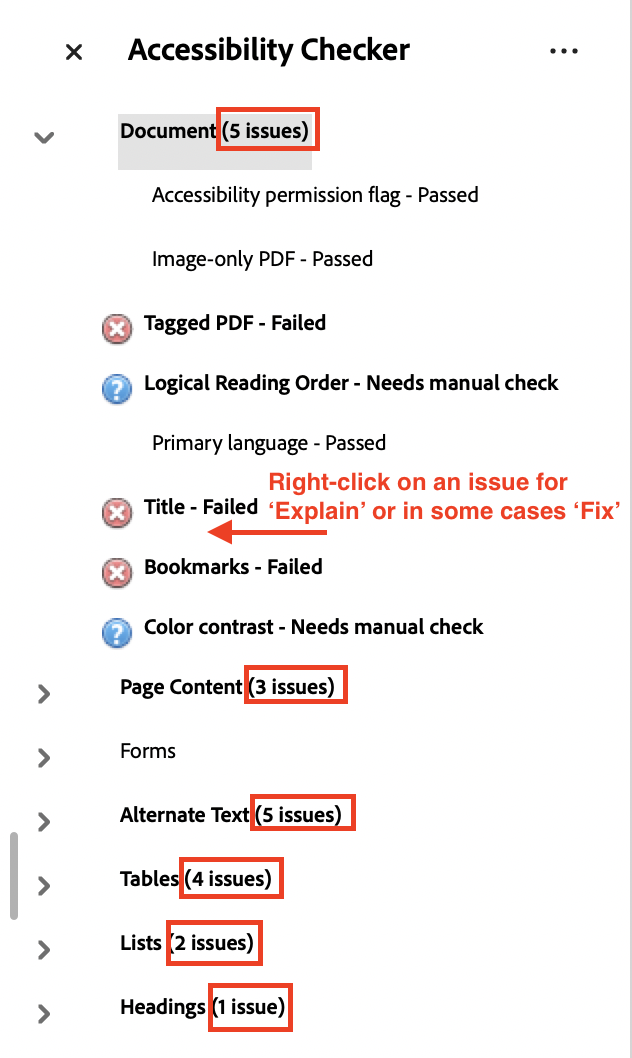
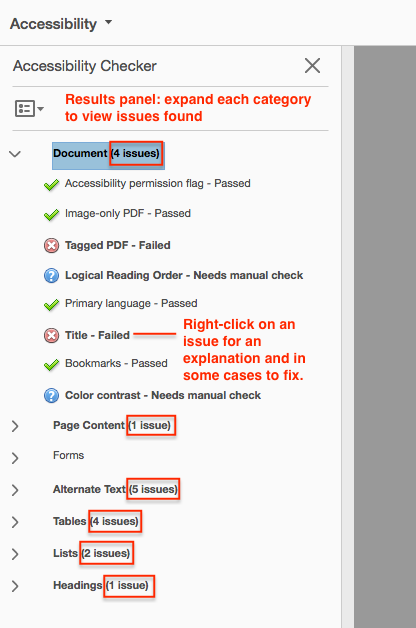
In the right pane of the application window, the Accessibility Checker results will expand when the check is complete. It will display the number of issues in each main category in parentheses. Expand each category to view any issues found in that category. Items that fail will be marked with a white x in a red circle. Right-click on a failed issue for more options such as "Explain" or, in some cases, "Fix."
It is important to note that you will always have a minimum of 2 issues in your document, even if it technically passes all accessibility checks. This is because there are a couple of things that cannot be checked automatically and require a manual check. These items are "Logical Reading Order" and "Color Contrast" and both are under the Document category. Both will be indicated by a white question mark in a blue circle and will always be there.
Use guided actions to correct the most common accessibility errors
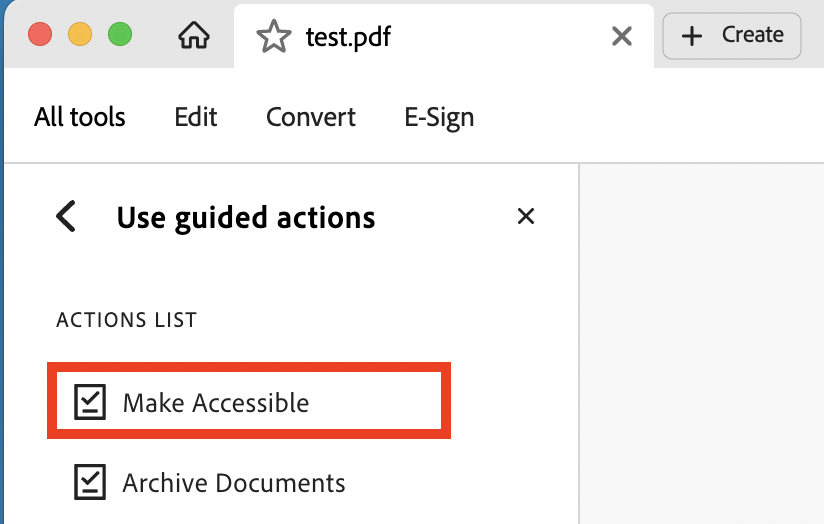
The quickest way to take care of the most common accessibility issues in your PDF is by using the Make Accessible action within the Use guided actions tool menu. This will scan the document and walk you through tasks such as adding a document title, adding alternate text for images (if any are found to be missing), and more.
If you don't see the Use guided actions tool, simply select the "All tools" tab at the top left of the application window. If you still don't see it in the initial list of tools, click "View more" from the bottom of the list and find it. We recommend dragging the tool toward the top of the list for future use.
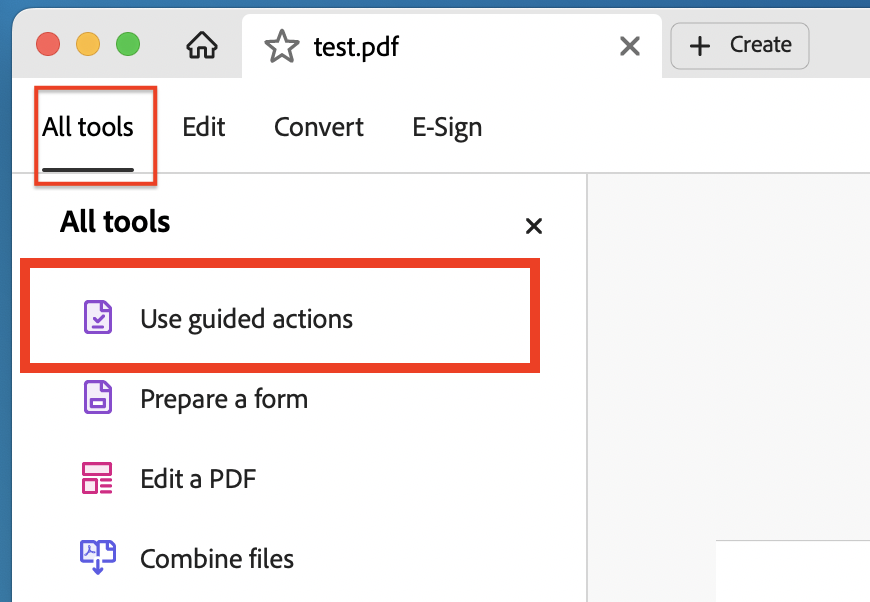
From within the Use guided actions tool, you'll find the Make Accessible action, which is an automated wizard that will walk you through high-level items to make your document accessible. The final step of the Make Accessible action will run Acrobat's built-in accessibility checker, which will provide you with a visual report of what passes and what might fail. The Make Accessible action will have taken care of most, if not all, of these issues in a basic text document. But you still may encounter errors and should follow Adobe's documentation for fixes to those errors once they have been flagged. For more detail on how to do this, continue reading the following section.
Use the Action Wizard to Correct the Most Common Accessibility Errors
The quickest way to take care of the most common accessibility issues in your PDF is by using the Make Accessible Action Wizard. This will scan the document and prompt you for things like the document title, alternate text for images (if any are found to be missing), and more.
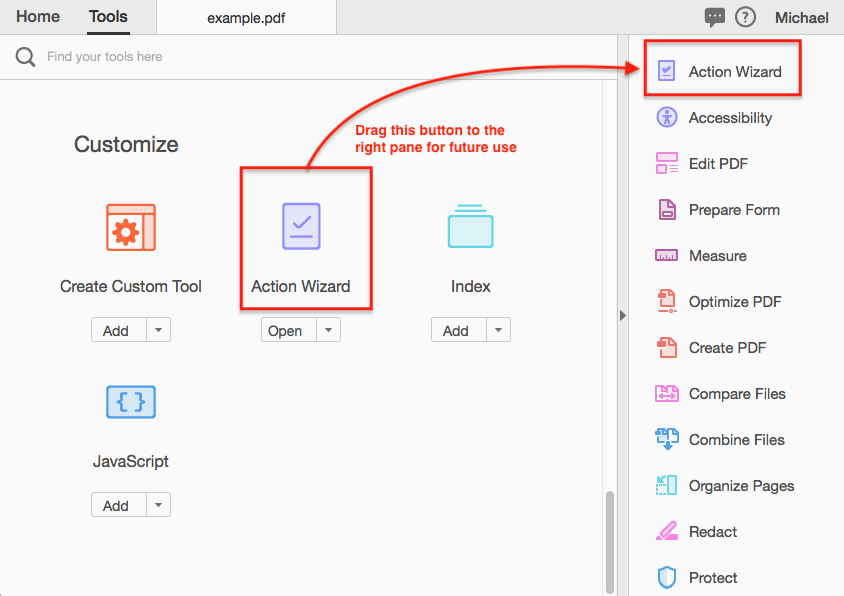
If you don't see the Action Wizard tool button right away, simply open your Tools view, scroll down until you find the section labeled Customize, and there you'll find the Action Wizard tool button. You should take the time to expand your right pane and drag this button over there so that you'll have it available to you for every document you work on in Acrobat.
The final step of the Wizard will run Acrobat's built-in accessibility checker, which will provide you with a visual report of what passes and what might fail. The Action Wizard will have taken care of most, if not all, of these issues in a basic text document. But you still may encounter errors and should follow Adobe's documentation for fixes to those errors once they have been flagged. For more detail on how to do this, continue reading the following section.
Check Your PDF for Accessibility Issues
Verify that your PDF files meet accessibility standards for people with disabilities. To do this, open your PDF and open the Accessibility view using the Accessibility tool button. If you already ran the Action Wizard outlined above, you can skip to Inspecting the Results further down.
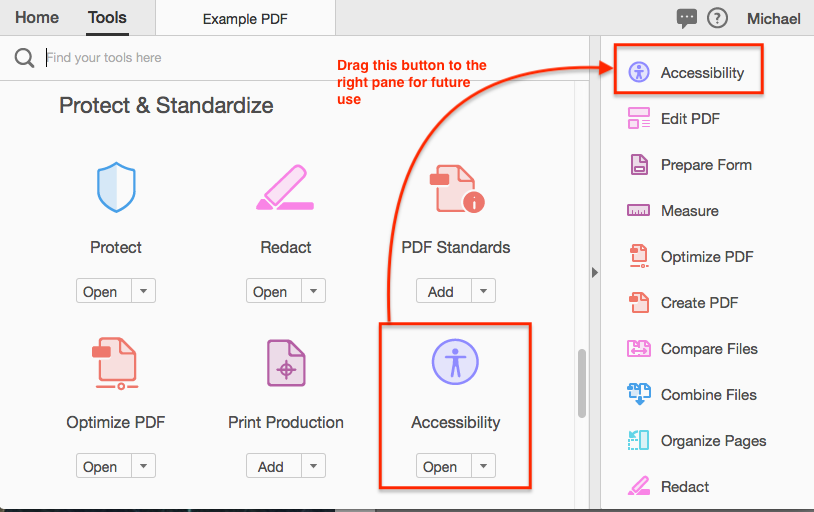
If you don't see the Accessibility tool button right away, simply open your Tools view and scroll down until you find the section labeled Protect & Standardize, and there you'll find the Accessibility tool button. You should take the time to expand your right pane and drag this button over there so that you'll have it available to you for every document you work on in Acrobat.
Open the Accessibility view using the Accessibility tool button.
- Open Accessibility view
- Click "Full Check"
- Click "Start Checking"
- View the results
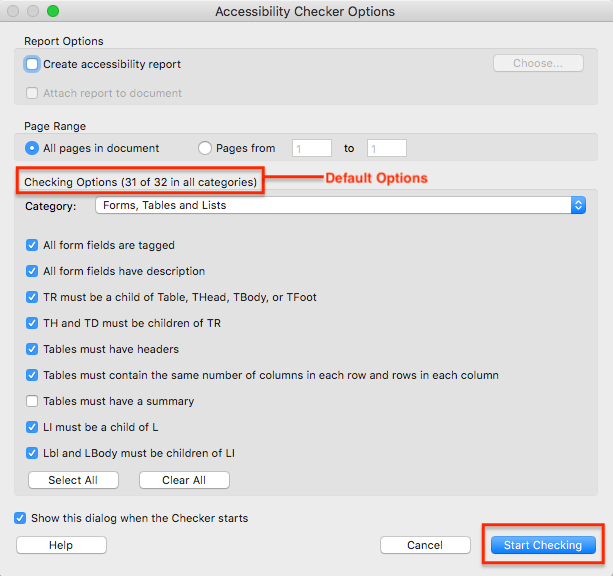
You will then be presented with the Accessibility Options dialog box. You should leave it set to the default options. At the time of writing, this setting will check 31 of 32 categories for possible accessibility issues.
Click Start Checking.
Acrobat will scan the document for accessibility issues and then display results for all categories in the left pane of the application window.
Inspecting the Results
In the left pane of the application window, view the Accessibility Checker results. It will display the number of issues in each main category in parentheses. Expand each category to view any issues found in that category. Items that pass will be indicated by a green checkmark, and items that fail will be marked with a white x in a red circle. Right-click on a failed issue for more options such as "Explain" or, in some cases, "Fix."
It is important to note that you will always have a minimum of 2 issues in your document, even if it technically passes all accessibility checks. This is because there are a couple of things that cannot be checked automatically and require a manual check. These items are "Logical Reading Order" and "Color Contrast" and both are under the Document category. Both will be indicated by a white question mark in a blue circle and will always be there.
Fixing Your PDF Accessibility Issues
The number and difficulty level of issues you may encounter can vary greatly. However, if we're simply talking about text-only documents and you've followed all of the tips in this primer thus far, you're probably going to have minimal work to do. This guide will not attempt to address the numerous, and at times highly technical, fixes for most PDF issues. Instead, we will cover a couple of common and simple quick fixes for a typical basic document.
Adobe Acrobat Pro has extensive documentation covering each of the issues you may encounter, and this information can be easily found by right-clicking on any issue and selecting "Explain" from the context menu. This will open a new tab in a browser and should scroll to the specific issue in the Acrobat User Guide. At the time of writing, that user guide can be found at https://helpx.adobe.com/acrobat/user-guide.html, and the relevant information is located in the section titled Accessibility, Tags, and Reflow.
Fix the Title
Not only does the title tell your users what this document is about, but it also becomes the text for the link that a Google search finds. Often, a converted Microsoft Word document inserts the title with the .docx extension and whatever other random file-naming conventions we have come up with. So even if this one passes, it's a good idea to go in there and clean it up.
To check and update your PDF title, open up the main application's File Menu, and select Properties. In the Properties dialog, the default view is Description, and right there at the top is the Title. Check that it reads just as a title should, removing any dates, file extensions, underscores, or any other unnecessary characters.
Tip: Even though you're posting this document to your PCC web page, Google and other search engines will still find it outside of this context, so it's good to include "PCC" or "PACCD" in the title somewhere, in addition to the title of your document.
Once you've updated the Title (and optionally Author, Subject, and Keywords) click OK. Now go back to the Accessibility Checker results and right-click the "Title - Failed" error and select Fix. The check mark should turn green. Now don't forget to save the PDF (Control+S on Windows, Command+S on Mac) so that fix gets saved if someone else checks your PDF for accessibility issues later.
Fix Alternate Text
If you didn't add alternate text via Microsoft Word from the tips in Part 1 of this primer, you'll still have an opportunity to do it here. Expand the Alternate Text category and right-click on the "Figures alternate text - Failed" issue. Select Fix from the context menu, and you will be presented with a dialog that allows you to add alternate text for every figure (image) that is missing it. Just add brief descriptive text in the text box provided and then either advance to the next image using the arrow button or click "Save and Exit." If you used the Decorative Image checkbox during the previous step, you may have a new set of errors after exiting this dialog. We recommend always including alternate text for each issue to avoid this quirk. Again, once you've corrected all issues here and you've got the green checkmark, save the PDF (Control+S on Windows, Command+S on Mac)
Other Issues
As stated previously, for all other issues you may encounter, please select the issue context menu item Explain by right-clicking an issue. If you get stuck on something, feel free to reach out to us! Just submit a request via our Web Help form at https://pasadena.edu/webhelp.
Remediation Requests
If you've followed this guide and still cannot get your PDF to pass the accessibility checker, or if your document is exceptionally long or complex where fixes are beyond the scope of this tutorial, you can request remediation at a cost to your department, facilitated by Strategic Communications and Marketing. Note: This request will require a Cost Center number.